David Tewes, Publicity

TPT (Twin Cities Public Television, also known locally as channel 2) did a story on David Tewes and his museum exhibit, which grew out of the website that I created in 2017.

Amateur photographer David Tewes captured scenes in Minnesota and out west after World War II until 1955. About 800 Kodachrome slides were found by a distant relative, who uploaded the images to a website in Tewes’ honor. The images were found by Minnesota Marine Art Museum curators in Winona, Minn., and they decided to show the work.

“Distant Relative: The Chris Finke Story.”

Link
Minnesota, Publicity

This happened last summer, but I forgot to mention it: Minnesota Public Radio ran a story about my research from 2013 on which state has the most shoreline.

“Chris Finke is a software programmer who is originally from Minnesota. He remembered watching an advertisement in 2013 from “Explore Minnesota” that claims there’s “More to explore in Minnesota,” including more shoreline than California. […] Finke decided to use an open-source mapping resource called OpenStreetMap and write a program to calculate the total shoreline for each state.”

It just goes to show you that genius is not understood in its own time, nor until it moves out of state.

Link
David Tewes, Minnesota

A website I made is now a museum exhibit

A photo of the New England Furniture Company building in downtown Minneapolis in 1950 by David Tewes Three years ago, I wrote about how I found old Kodachrome slides in my father-in-law’s attic, scanned them, and put them online at DavidTewes.com.  In an unexpected turn of events, photos from that website are now on display at the Minnesota Marine Art Museum.

Jon Swanson, the curator of collections and exhibits at the museum, reached out to me early last year. He serendipitously came across the site and felt that David had taken a number of photographs that fit in with the museum’s mission of exhibiting art inspired by water. I sent him the slides, and after what I’m sure was a significant amount of work on his and the museum staff’s part, the exhibit launched on January 10: Shutterbug: The Mid-Century Photography of David Tewes.

Minnesota Public Radio covered the news:

“Dave Casey, assistant curator of education and exhibitions at the museum, said the images carry both artistic and historic value that merit an exhibition. In addition to documenting that era, they also serve as a lesson of what photography was like and how it was experienced in the 1940s and 1950s. And Tewes’ unique eye and experimentation created visually interesting work.”

Their story generated almost 15,000 pageviews on DavidTewes.com and surprised my sister-in-law’s husband when he heard my voice on the radio on his way to work.

KSTP, the Minneapolis/St. Paul ABC affiliate, did a segment about David and his photos as well on the evening news:

If you’re in or near Winona, Minnesota (yes, the same Winona from the Super Bowl commercial), the exhibit of David’s photographs runs through May 3.

Standard
Maker, Woodworking

Whoever named the fireplace, good job

This was the fireplace in our living room.

It never worked properly since we moved in, since the previous owners didn’t use it once in twenty years. Fixing it would have cost as much as replacing it, and in order to replace it, we would have had to tear out the surround, and in order to tear out the surround, we would have had have to remove the bookshelves… Long story short:

We planned on replacing it all with a setup that looked like this:

We hired a professional to install the new fireplace and run a new vent line, but I did the rest myself.

We bumped the fireplace out into the room so that it would be more of a focal point, and we replaced the side bookshelves with different shelves on the top and a drawer/cabinet combo on the top.

The panels next to the fireplace open up to reveal storage with adjustable shelves — a good spot for video game consoles.

The panel above the fireplace opens up to allow access to the area above and behind the fireplace, just for good measure.

Because the fireplace was no longer embedded in the wall, it opened up a space between the living room and the utility closet behind it, so I built a shelving unit to use that space.


Standard
Maker, Woodworking

The name’s Bed. Murphy Bed.

Remember that scene from Full House when Jesse gets trapped in a Murphy bed?  Well, I do, and I realized that if John Stamos ever visits my home, I wouldn’t have a Murphy bed for him to get stuck in, so I built one:

I used this hardware kit and set of plans from Rockler. The build process was pretty simple, so I didn’t take any pictures of it, but here’s a photo of John Stamos trapped in the bed after it closed on him while he was visiting my house.

Standard
Maker, Woodworking

I Turned One Desk into Two End Tables

I got this old desk for free. Once I got it home, I realized it was too big to fit anywhere in our house, so I left it under a tarp in my shop.

A year later, I was cleaning up my shop and found a giant desk under a tarp.  I decided to either get rid of it or cut it up and turn it into end tables, and my wife cast the tie-breaking vote for end tables.

I unscrewed the desktop and cut the base of the desk in half. Because there were only two legs on the rear of the desk, each end table needed a new leg on the back corner. I made the legs out of walnut:

Each leg has a quarter-inch mortise cut into two different sides to accept the panels from the back and side of the table.  They are also tapered, about 3/16″ over the bottom seven inches of each side of each leg (taper not yet cut in the picture above).

The bottom panel of the left section of the desk was in rough shape.

I replaced the rail in front by cutting a new one out of maple:

I also made a new tenon for the top stile out of red oak.

I cut up the desktop to fit each table, glued strips of red oak to the cut sides, and then sanded and restained them. I used a mix of Varethane’s Ebony and Kona stains (black and very dark brown), which worked especially well on the new legs, which match the color of the old legs almost exactly.  The oak didn’t stain match as well; I wish I had had some walnut long enough to make veneer out of, but I only had enough to make the legs.

The left section of the desk had a typewriter lift in it. It was neat, but we couldn’t find a reason to keep it.

I replaced it with just a static shelf cut out of the remaining portion of the desktop.  I can still re-attach the typewriter lift if we find a use for it.

Standard
Beekeeping, Life, Maker, Woodworking

I’ve Got Bees!

Previously, I posted about about having hives. Not content to stop there, I have filled the hives with bees!

I bought three nucs and moved them into my hives on a dreary Saturday.

(After taking this picture, I added another five empty frames to fill the rest of the space.)

The nucs were positively buzzing. The bees had built some burr comb on the side of the box and had already started filling it with nectar.

The store was out of entrance feeders, so I built three myself, using this Instructable. I used scrap poplar and the same aluminum flashing that I used for the hive lids.

(I’m experimenting with the bucket and some floating hardware cloth for providing water to the hives.)

A week later, during my first hive inspection, the bees had started drawing comb on the new frames I had installed and were bringing lots of yellow and orange pollen back to the hive.  Check out those bees’ knees! I think they are the bees’ knees.

Standard
CNC, Maker, Woodworking

I Built a Custom Closet System

My daughter’s closet was just a 4′ x 5′ space with two hanging bars and a shelf, which was not an efficient use of the space. If I had taken a “before” picture of this project, you would be able to see that, but I didn’t take any pictures until I had ripped out the shelf and started installing the supports for the custom organization system, which you can see here:

I also didn’t take any pictures of the construction process, so you’ll have to trust me that it happened.

The finished system comprises seven separate cabinets: two sets of drawers, two corner units, and three shelving units with adjustable shelves.  Everything is made of melamine with edge banding, except for the drawer faces, which are poplar and plywood.

For the corner units, I made the shelves with a rounded inner edge, which I think is pretty snazzy.

If you think the empty closet looks good, you should see it full! And now you will!

The hanging rod on the right is adjustable, since it is attached to the bottom of the adjustable shelf.

This project took 58 hours of work over about three weeks (plus half an hour two months later to finally install the moulding).

Standard
Maker, Woodworking

Turning Billy Bookcase into William Bookcase

Years ago, when we were young and poor, my wife and I bought a Billy Bookcase from Ikea. It looked like this:

Now that we are sophisticated wealthy adults, we wanted — no, needed — something classier. So, I painted Billy, gave him a face frame, and added moulding to the top and bottom. I made the moulding myself using a roundover bit, a cove bit, and some strategic tablesaw cuts. I also replaced the waxed cardboard that was acting as the back of the bookshelf with some lauan plywood.

Standard
Beekeeping, CNC, Maker, Woodworking

I’ve Got Hives!

Beehives, that is!

I’m going to be keeping bees this year, and I built and painted my own hives.

One is an ode to Lincoln:

One is a rainbow honeycomb pattern:

And one was an attempt at a foggy mountain scene:

I hope the bees like them. I think they are the bees’ knees!

Standard
Christmas, CNC, Maker, Woodworking

Secret Santa 2018: Japan in Maple and Walnut

For my workplace Secret Santa gift exchange this Christmas (you know, the one that very recently took place), my recipient was a Japanese citizen who likes to hike, so I made him a 3-D topographic map of Japan out of maple and walnut.

The steps to build it were pretty simple, so I won’t caption all the photos, but basically, I glued up a walnut panel, carved Japan out of maple with my CNC router, and then magically conjoined them. Tada in Japanese!


Standard
Maker, Woodworking

I Built a Bed That Is Also a Playhouse and a Slide and a Dresser and a Bookshelf

My five-year-old daughter saw my wife browsing Pinterest, and long story short, I ended up building this bed/playhouse/slide/dresser/bookcase for her room:

I planned it out in SketchUp. It’s an original design inspired by a number of beds online, and the slide is based on The Wood Whisperer’s bunk bed slide. (My SketchUp file is available here.) If you’d like to build your own, I made a 40-page set of plans and you can get the PDF on Etsy.

The stairs have built-in drawers, so they double as a dresser.

The bottom three drawers don’t run the full depth of the stairs, so there’s space at the back for books and baskets.

There’s another bookshelf built into the space underneath the slide. One side is accessible from inside the playhouse…

…and the other side is accessible from under the slide.

The slide is made of melamine, the structural portion of the bed is poplar, and most everything else is MDF.  The cedar shingles were left over from my Infinity Wishing Well project.

From start to finish (although not including the time to design it), this project took 107 hours over two months — well worth it, considering my daughter will spend at least 3,000 hours using it every year.

Standard
CNC, Maker, Programming, Woodworking, X-Carve

Generating and Cutting Halftone Images on the X-Carve

Halftone is an app I’ve written for making halftone-style carves with Inventables’s Easel CNC design platform. A halftone image uses different sized dots to represent light and dark areas.

Upload an image, and Halftone will convert it to a grid of holes with each hole sized to reflect the brightness of the image at that point. Darker areas are represented by wider holes; if you’re going to backlight your carve, you can invert it and have lighter areas use wider holes.

Continue reading

Standard
Maker, Woodworking

I Made a Stand for a Daily Photo Calendar

We bought a photo-a-day calendar for 2019, but because it didn’t come with any sort of stand, it was in danger of getting broken apart prematurely.  I made this stand for it that doubles as storage for the used pages so they can be used as a notepad.

Underneath the calendar, there’s a slot where old pages can be inserted or removed. (The wooden divider between the calendar and the old pages is not attached to anything; it just floats up or down depending on how many pages are underneath it.)

I made this stand out of an interesting block of wood that was given to me by a friend. I don’t know what type of wood it was, but its coloring is pretty similar to red oak. For scale, the calendar is about 3″ square, and the sides of the stand are 1/8″ thick.

Standard
Clockback, PHP, Programming, Web Applications

Run Your Own Open-Source Timehop

I like the idea of Timehop: seeing all of the photos I took on this day in years past. I don’t like the idea of sharing all of my photos with a third party, so I built an open-source replacement for Timehop that runs on my own computer and server; it’s called Clockback.

Clockback is two things:

  • a BASH script that uploads all of the photos I took this week in previous years
  • a single-page web app that displays the photos from this day:

To use Clockback, you only need two things:

  1. Your photos organized so that their filename begins with the date on which they were taken, e.g. “1969-07-20 – Moon landing.jpg”. (I use iPhoto Disc Export to do this.)
  2. A Web server to upload them to.

As long as you can run the script included in Clockback once per week from your computer, the Clockback webpage will have photos to show, and it will remove old photos, so it doesn’t use a lot of disk space.

To get the code and all of the details on how to run Clockback, check out the README in the GitHub repo.

Standard
CNC, Maker, Woodworking, X-Carve

I Made a Truly Simple Pencil Box

I made this sliding-top pencil box for our three-year-old goddaughter. It’s all Baltic birch; the sides are half-inch and the top is quarter-inch.  I carved the design with my X-Carve, painted the carved area, and then finished the entire box with a spray enamel clearcoat.

Standard
3D Printing, Maker, Woodworking

Shaker-Style Jewelry Cabinet

I built this Shaker-style jewelry cabinet for my wife. You’ll never guess what’s inside…

If you’d like the plans for this cabinet, you can find them on Etsy.

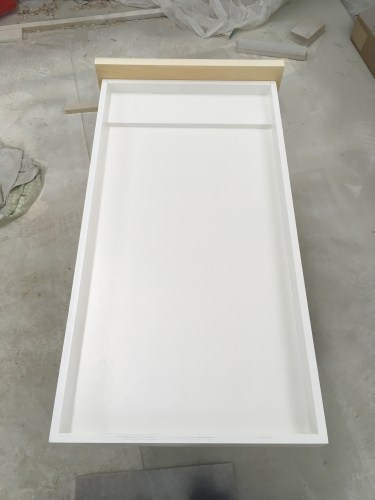
The cabinet box itself is only 1 3/4″ deep. These are the four sides; the top is shorter because it won’t be mitered, since the top of this box will be hidden in the final product.

I cut a rabbet into the back of the sides so that they could accept a quarter-inch piece of plywood for the back of the cabinet.

I love my 90º clamps.

I would love to have more clamps too.

Here’s the main box after being glued up.

I added this half-inch pine board so the hooks (for hanging necklaces) would have something to screw into and to keep the hanging jewelry away from the back of the cabinet.

I painted the interior of the box at this point because it would be very hard to reach with a brush or sprayer after installing the face frame.

I’m not sure why I didn’t install the top board before doing these coats of paint, but I guess I did it at this point.

Here’s the assembled face frame, made of 3/4″ poplar.

I don’t normally fill any of my pocket holes, but I had four plugs that came with my Kreg jig forever ago, and these holes might have been accessible to dust and lint inside the cabinet if I left them open.

I glued and nailed on the face frame and then filled the nail holes:

I then gave it another three coats of white semi-gloss.

I installed the hooks in two rows, with each hook an inch from its neighbor.

And I hung it up in the bathroom while I worked on the door.

The door was built using cope and stick joinery. These are the four sides; I cut the groove and tenons with a dado stack on my table saw. The groove is a half-inch deep and a quarter inch wide, and the tenons are sized to fit perfectly in the groove.

This is how they go together. Pretend that I also took a photo of the door after inserting the plywood panel and gluing it all up and painting it, because I forgot to do that.

This is a jig I 3D printed to help install the hinges. You drill a hole in the hole, and then the hinge fits in there.

I added a handle to the door, and boom: a door with a handle.

See how easily the jewelry hangs from the hooks?

We decided that the cabinet could use a second row of hooks about halfway down, so I made a second row of hooks about halfway down.

Tada!

Standard
Maker, Woodworking

I’ve Been Framed!

In a picture frame, that is! I made this 30″x20″ frame for my wife, who wanted one for our wedding picture in the same style as this smaller frame she found:

The new frame is constructed of 3/4″ Baltic birch plywood. I started by making the sides (each 3″ wide) and cutting a rabbet into the back of each to accept the glass, photo, and backer board, and then I mitered the ends and glued them together into a basic rectangular frame. (There are no photos of this process, so you will have to believe me. You MUST believe me.)

Then I drew the scalloped shape, cut it out with a bandsaw, cut a cove into the edge, and stained it with Varethane’s Kona stain.

This is so the stain can show through on the edges, which I will weather after painting. Speaking of painting:

I gave the frame three coats of semi-gloss white and then roughed up the edges to match the frame it was modeled after:

I used window glazing points to secure the backer board.

And then I hung it on a wall. The end!

Standard